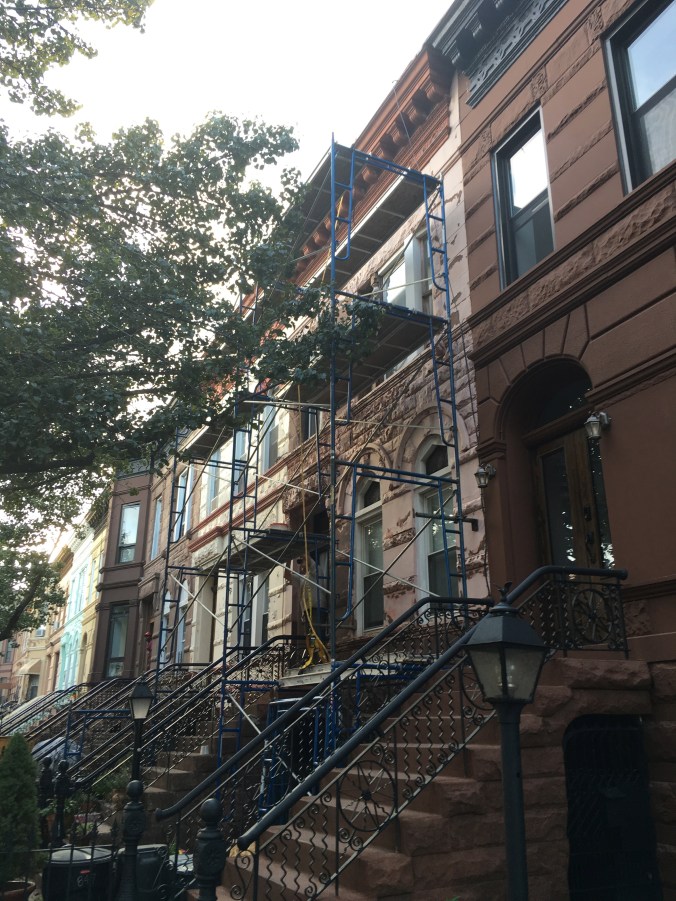
Week 1 of the façade project is coming to an end. It still feels slightly unreal that we are tackling this. We’ve known for several years that we would need to do something about our façade, not just because of the ugly pink, but because the ugly pink was actually the wrong kind paint (regular paint, not masonry paint) and it was causing damage to the brownstone.
Kinda like this:
Painting brownstone is generally not a good idea. Brownstone is a type of sandstone, which is very porous and soft, as far as stones go. Whenever water gets trapped in it (because it found a way in somewhere – water will always do that – but can’t find a way out, because it’s sealed in by paint), and temperatures drops during the cold months, the bits of water will freeze, which will cause them to expand and break a little bit of the stone. This is called a freeze and thaw cycle, and can happen dozens of times during the winter. It’s small incremental damage that eventually will become big/expensive/difficult to fix. The stone will appear deteriorated and turn to sand when you touch it. Not good. Not good at all.
Sometimes painting a brownstone is inevitable (at least for some of us, mere mortals and not Captain Money Bags). If that’s the case, using the proper type of paint (masonry paint) and making sure that the surface is properly prepared and properly painted should go a long way to prevent further damage.
Anyway. Here we are. Our façade was improperly painted in too many ways. Over the course of 4 winters, it went form fully painted to fully peeling. While this makes the removal of the remaining paint easier, it also escalates the urgency of getting this done before winter, as we have more ways for water to get in and damage the stone.
The only sane way to get this done is to put up scaffold, which went up on Monday. We have a total of 28 days to get the job done, before the scaffold goes away. No pressure.
So day 1, scaffold goes up, exploratory surgery is performed. We were always curious on whether our turned columns by the top bay window were still there. Our windows have thick bands of white vinyl flashing, a nod to an era we are not fond of, aesthetically speaking (hello 1990s).
Flashing was removed from the first window. The original window frame was stripped and painted black. Yes, this leaves us with a 2-tone paint job, but the windows will ultimately be replaced (with black ones), so this is preemptive.

Window frame minus ugly flashing. Existing window frames were stripped, painted and priorly caulked. Some of the paint on the stone on either side has been removed.
Day 2-5: Removed flashing from the first part of the bay window and found the original turned column. While it’s still there, it is in terrible condition. Our best guess is that the flashing was improperly installed and trapped moisture behind it. It will get stripped and painted (for now), but may need to be re-created in the future.

Damaged column, rotted windwo to the left.
Also, the only 2 remaining original windows in the whole house are rotted. Because of course they are.
Stripped the first chunk of façade (Peel Away has a dwell time of 36-48 hours to do its thing, so the initial setup can take a little time). While the paint came off fairly easily, found damage caused by improper patching of the stone. Seems as Portland cement was used to patch the stone, which means 2 things: damage to the stone, because the cement is too hard (same thing with the old bricks), and also it’s nearly impossible to get paint off cement. Don’t know why, but it is.
Weekend 1: cornice time! Our cornice had holes, that much we could see form the street. What we didn’t know was the extent of the damage. Also, we didn’t know anything about cornices, other than they are pretty.

Here is what we learned:
- Tin cornices are very very fragile, particularly the crown part that forms the overhang. Ours downright wobbly and could be damaged by a distracted bird inflight.
- Patching a hole presents a conundrum, because the patching material must be non-reactive to the tin. It must also expand and contract at the same rate, otherwise the repair won’t last.
There were 3 holes in the front of the overhang. These were patched with Bondo. There was also damage along the top, close to where the cornice meets the roof. This was something that we couldn’t see from below, and learned once we got up there.
(by we I mean Scott, because there is not a chance I will climb up that high. I’d need the FDNY to come pull me down, it would be scandalous).


Cornice repair in progress. From Muppet-flesh orange to black.
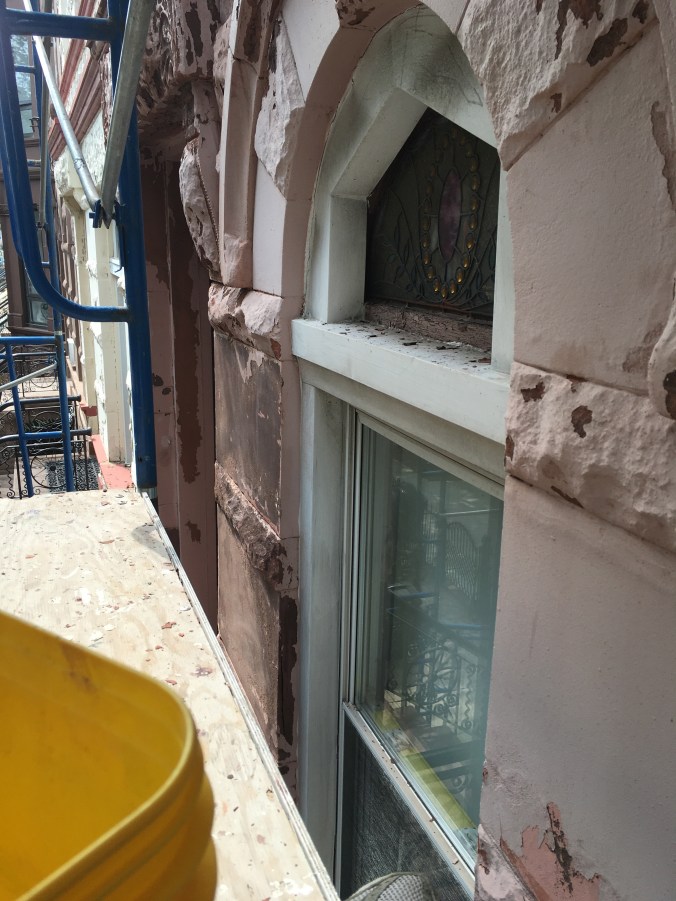
Anyway. while Scott was doing work up above, I was picking paint off the rough stone above the parlor window arches. Got to look at the stained glass up close and they are in terrible shape. The lead is sagging and folding over itself. Not good.
Seriously. This flashing. Why? Why? WHY?

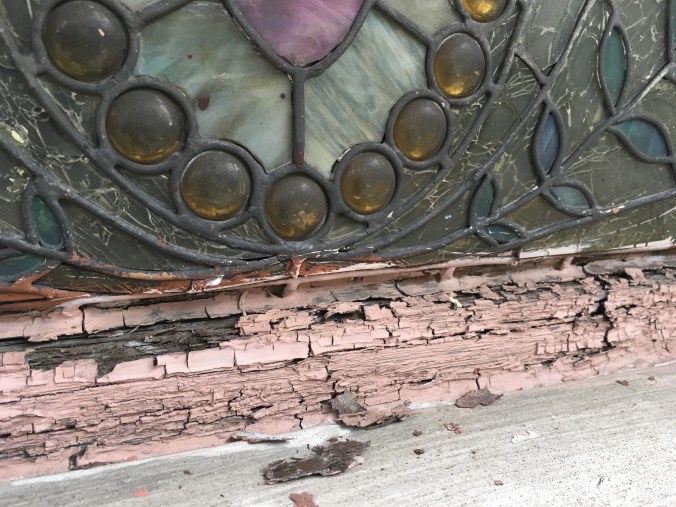
Sagging stained glas. Sigh.
So this is where we are. I’m sure there will be plenty more eye rolling this coming week.

fascinating! when you strip the facade of pink paint, will you resurface it back to its original appearance or will you paint it over?
It will stay exposed stone, as it it was originally in 1895
will you be changing the name of your blog?
No, she will always be The Pink Lady