Much ado about toilets

Progress in the parlor bathroom has been, well…. essentially none. Part of the holdup is that I can’t decide what toilet to buy. I know we want a high tank toilet. But beyond that, the logical brain and the lizard brain are in great conflict.

Scott won’t let me have an actual old toilet (I already made that argument multiple times and have been vetoed every time – something about the possibility of leaking sewage and such). Continue reading

Finished floors

To be honest, I didn’t think this day would ever come. This August it will be 2 years since we last occupied our bedroom. The whole bedroom saga started with this, this, then this, this, a little progress here and finally the floors.

The bedroom project has been the perfect example of how things to go for us: wild enthusiasm, followed by huge list of things that need to be addressed before we get to do what we really want to do, followed by a period of moroseness, and finally completion – well, mostly completed.

This is what the floors looked like before we started. Continue reading

Austerity (or the fear of unannounced visitors)

Progress has been slow these days and work happens in fits and bursts. In the 3 years since we’ve taken over care of the Pink Lady, there has been a grad school graduation, a new job, and a miscellany of small events that go along with being an adult (ha!). In other words, life continues to chug along and compete for time with the house projects.

We got to the point where we grew accustomed to the detritus that comes with living through construction:  don’t mind that door leaning against the balustrade; pay no attention to that massive tile cutter in the foyer. Oh, those 803 bricks stashed under the stoop? Yeah, we’ll get to them at some point. You accumulate things you have grand plans for, yet never seem to get around to the execution phase. (We are prolific accumulators of architectural salvage. In my mind, that makes it all OK and not crazy. Not at all…)

I’m tired of the piles of stuff everywhere, the stuff we’ll get to eventually, yet never seem to. I’m so tired of being worried one of the neighbors might knock on our door and I may have to invite them in and let them see our utilitarian hovel. I don’t know about you, but I believe that unannounced visitors are the Kryptonite of the DIYer. Anytime we have friends over, there is a at least a half day worth of frenzied cleaning and organizing and just shoving things behind a door we won’t let anyone open (don’t go in there – fumes! the magical word that keeps people away). As we learned, normal people don’t have a 120-year old salvaged sink and marble vanity sitting in their hallway for months. Weird.

All this brings me to the Austerity Measures we have just declared. This year, no big projects will get started. Instead, we’ll focus on finishing what we have already started, then we’ll focus on “quality of life projects,”  like finally banishing all traces the Muppet Flesh paint (even if it means painting over it for now), to pulling up the shitty parquet floor in the parlor (the floor has been helping us along by removing itself from the subfloor) and finally  accepting the fact that our new kitchen is light years away and might as well spruce up the one with have.

We haven’t been total slackers, though. After redoing the bedroom ceiling and stripping the walls, it’s looking like this (walls have been primed, not painted yet).

Progress has been made

Progress has been made

Still working on that picture rail that lost most of its detailing in the stripping process.

If you recall, it used to look like this (shield your eyes, not for the faint of heart):

At the point of no return.

At the point of no return.

Our seam-taping skilsl have improved considerably and I’m happy to report that there are no visible seams, bumps or other unsightly blemished on our new ceiling.

On we go. What are the odds we get to move back into our bedroom before August 3, 2015 (the 2 year anniversary of this project)?

Early Stages of a Garden

It’s been a cold, long winter in New York City. Yesterday was the first day of spring. Next week, we will likely be smacked upside the head with a Nor’easter once again. I am so done with the Polar Vortex.  This time last year, I was already playing in the dirt. This year, however, I’ve been keeping my excursions outside to a minimum. A winter person I am not.

We spend a ton of time outdoors during the warm months, and while our back yard has been presentable(ish) over the past 2 summers, a big overhaul was always part of the house master plan. At some point. In the very very distant future.

Backyard2012

Backyard in 2012, our first summer. The big bushy plants to the right are tomatoes. It was a fantastic year for tomatoes.

Backyard2013

The backyard in 2013. The fence was replaced and we built a planter/retaining wall to compensate the height difference between our yard and the one behind us. It was a terrible year for tomatoes.

3/4 of the way through this particularly harsh winter, our garden redo got bumped up in priority, courtesy of the water that came gushing into our basement during a rain/freezing rain/snow/rain event. We realized we needed to pay some attention  to the garden drainage and the pavement that is not sloping away from the house quite enough. Oh, and the holes. There are holes where the coal chute joins  the house.  Because, why not?  True to the old adage of “project begets project,” we figure we might as well go the Full Monty on this. In addition to the must-do-to-keep-the-basment-dry (re-sloping the surface closest to the house and installing French drains  throughout the yard), we’ll be doing a fair amount of cosmetic work, too. Woo hoo landscaping!

FloodedBackyard

This is what happens when it rains: the water has nowhere to go, so it just hangs out.

Puddle

This is actually really close to the house. Not good.

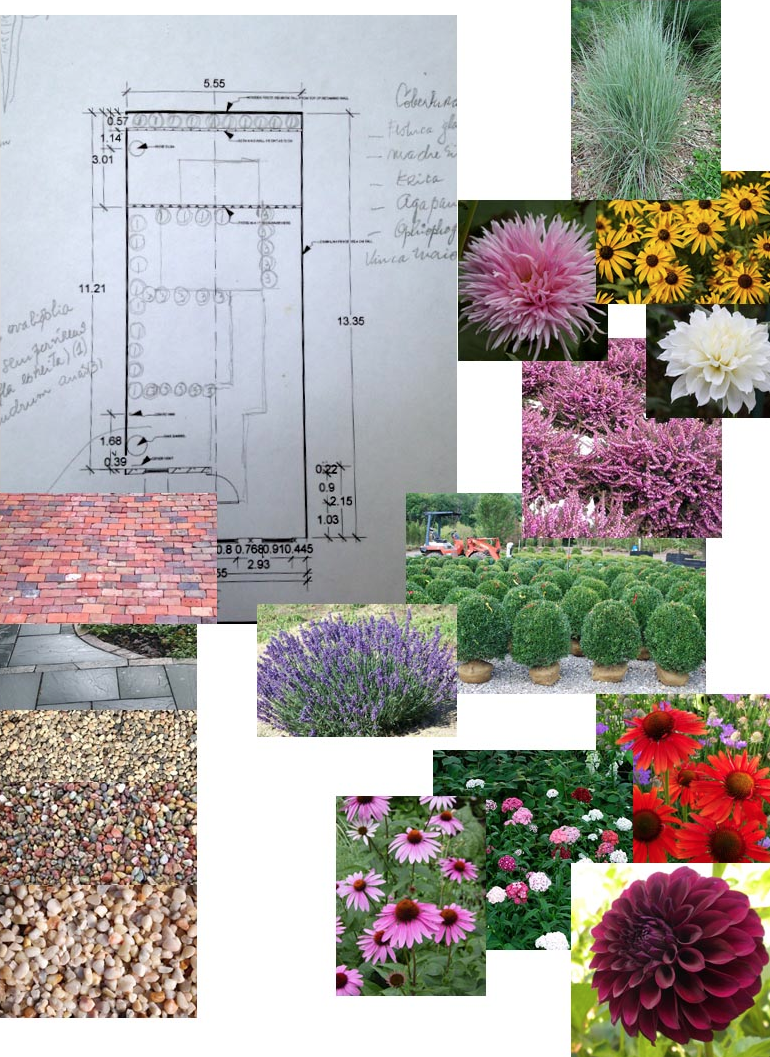
About 4 months ago, we had preliminary plans drawn by a fantastic landscape architect (aka, dad). The design calls for separate living areas in our compact yard: seating under the grape-vine (new arbor, pebbles underfoot), a grilling area and eating area (both paved with reclaimed old pavers), as well as shrubs and perennials evoking a Victorian garden.

Garden Board

The design, along with some of the materials and plants. Yep, I do suck at Photoshop.

To put the design into practical perspective, I ventured outside today and drew it in chalk, making some changes along the way. I think I worked out most of the kinks (and found a dead bird along the way).

Chalky

Pardon the ugliness, but the garden is still asleep.

Dad says good garden design has a bit of mystery drawn in. I don’t think he means all the blank spots on his sketch, but rather that one should not be able to see everything all at once, that one would wind their way through, and discover new areas. That is easier said than done with a back yard that measures about 40 feet x 18 feet. Dad proposes a complete re-think of how we use the space. The table will move to the back of the yard, where the vegetable garden is (at some point, it will get sanded and slathered with Tung oil – yep, on the list). The area beneath the grape-vine will get fine gravel, and will house a seating area with custom-built wooden benches. We’ll reduce the hard surfaces of the yard (which will also help with drainage), and use reclaimed old brick pavers as our main surface material.

Salvage Pavers

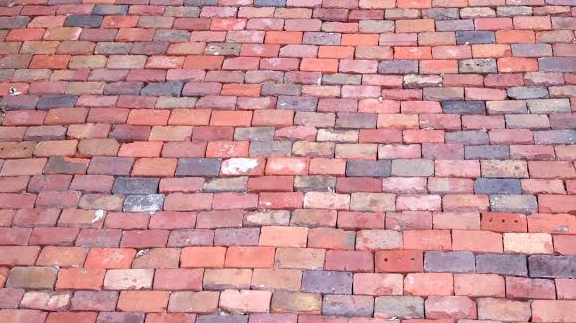
Sweet old brick pavers. How I love thee!

It all sounds fine and dandy. Once reality sinks in, including carrying all this stuff through the house, I’m sure it will be a different story.

Update-ish

With the weather getting cooler stupid cold, the work outside has slowed  stopped. October/November were not particularly productive because work (as in we need to fund this restoration by actually working)  got in the way. Here is where we left things off:

Facade

The garden level is mostly done, but there are still some stubborn patches, primarily where the stone is deteriorating. It’s particularly bad where there are patches on the brownstone. I have yet to find a good method of removing paint from cement (at least I think it’s cement – I can’t tell for sure since it’s covered in paint).

Facade2

Not surprisingly, we are STILL waiting for estimates from the contractors for the stripping and repairing of the brownstone. Somehow, I have a feeling I’m in this for the long haul and I best get cracking and learn how to patch the stone myself.

Weekend projects by crazy people

A  comment from a neighbor pretty much sums it up: “I always see you here, working. Never partying.  Just working.”

Before

I’m pretty sure the neighbors think I’m absolutely certifiable. Stripping a stone façade is really not a typical DIY project. People usually hire professionals to do that, and methodology aside, I do understand why.  Passers-by provide random words of encouragement, usually punctuated with “that’s a lot of work,” or “this would go a lot faster if you hired someone.” No shit!

This past Sunday over the course of 8 hours, I managed to strip about 18 sq feet of stone. At first glance, seems like a worthy amount, until you realize that it’s really a drop in the bucket. Not accounting for windows and doors, the area of the façade is 558 square feet – give or take.

Some of the paint came off super easy, yet there are patches of stubborn pink that will need a second application of PeelAway. Damn you pink paint!

SlowProgress

The angle of the sun makes it difficult to see any progress. Behold my amazing Photoshop skills! Yellow denotes done-ish. Click to enlarge. 

But wait! There is more!

Because we have two major projects going at the same time (hence the crazy people part) while I scrapped and scrubbed, the hubs worked on leveling the bedroom ceiling beams. The question of the day was “level it to what?” Under normal circumstances, you’d level to gravity: something is either level or it’s not – simple as that. But  nothing is ever as simple as it should be, at least not at our house. As is the case with many old buildings, ours settled over time and the floors are no longer level. The Pink Lady has a noticeable dip towards the center, common to brownstones. It used to drive me crazy and I wanted it gone, but I’m so used to it now I don’t really notice it anymore. Call it charm. Call it being realistic.

The previous fake ceiling was leveled to gravity, making the moldings look super crooked.

Old Ceiling


If we leveled the new ceiling to gravity, then leveled the floors, we would have to open the walls and adjust the all the door openings (2 regular doors and the massive double pocket door), or else the doors wouldn’t close). That just seemed too big of a job in the grand scheme of things.

So reality rears its ugly little head again, and since the dip is normal and is not affecting the structural integrity of the house, we decided to level the ceiling to the floor. By having everything crooked together, it will appear straight. Basically we’ll be mimicking the original ceiling (minus the sag in the middle).  Cooky plan, I know – but it seems like the best option.

After the required number of trips to the hardware store, the uttering of a lot of profanity, and a few beers, we are perhaps a teeny tiny bit closer to being done.